
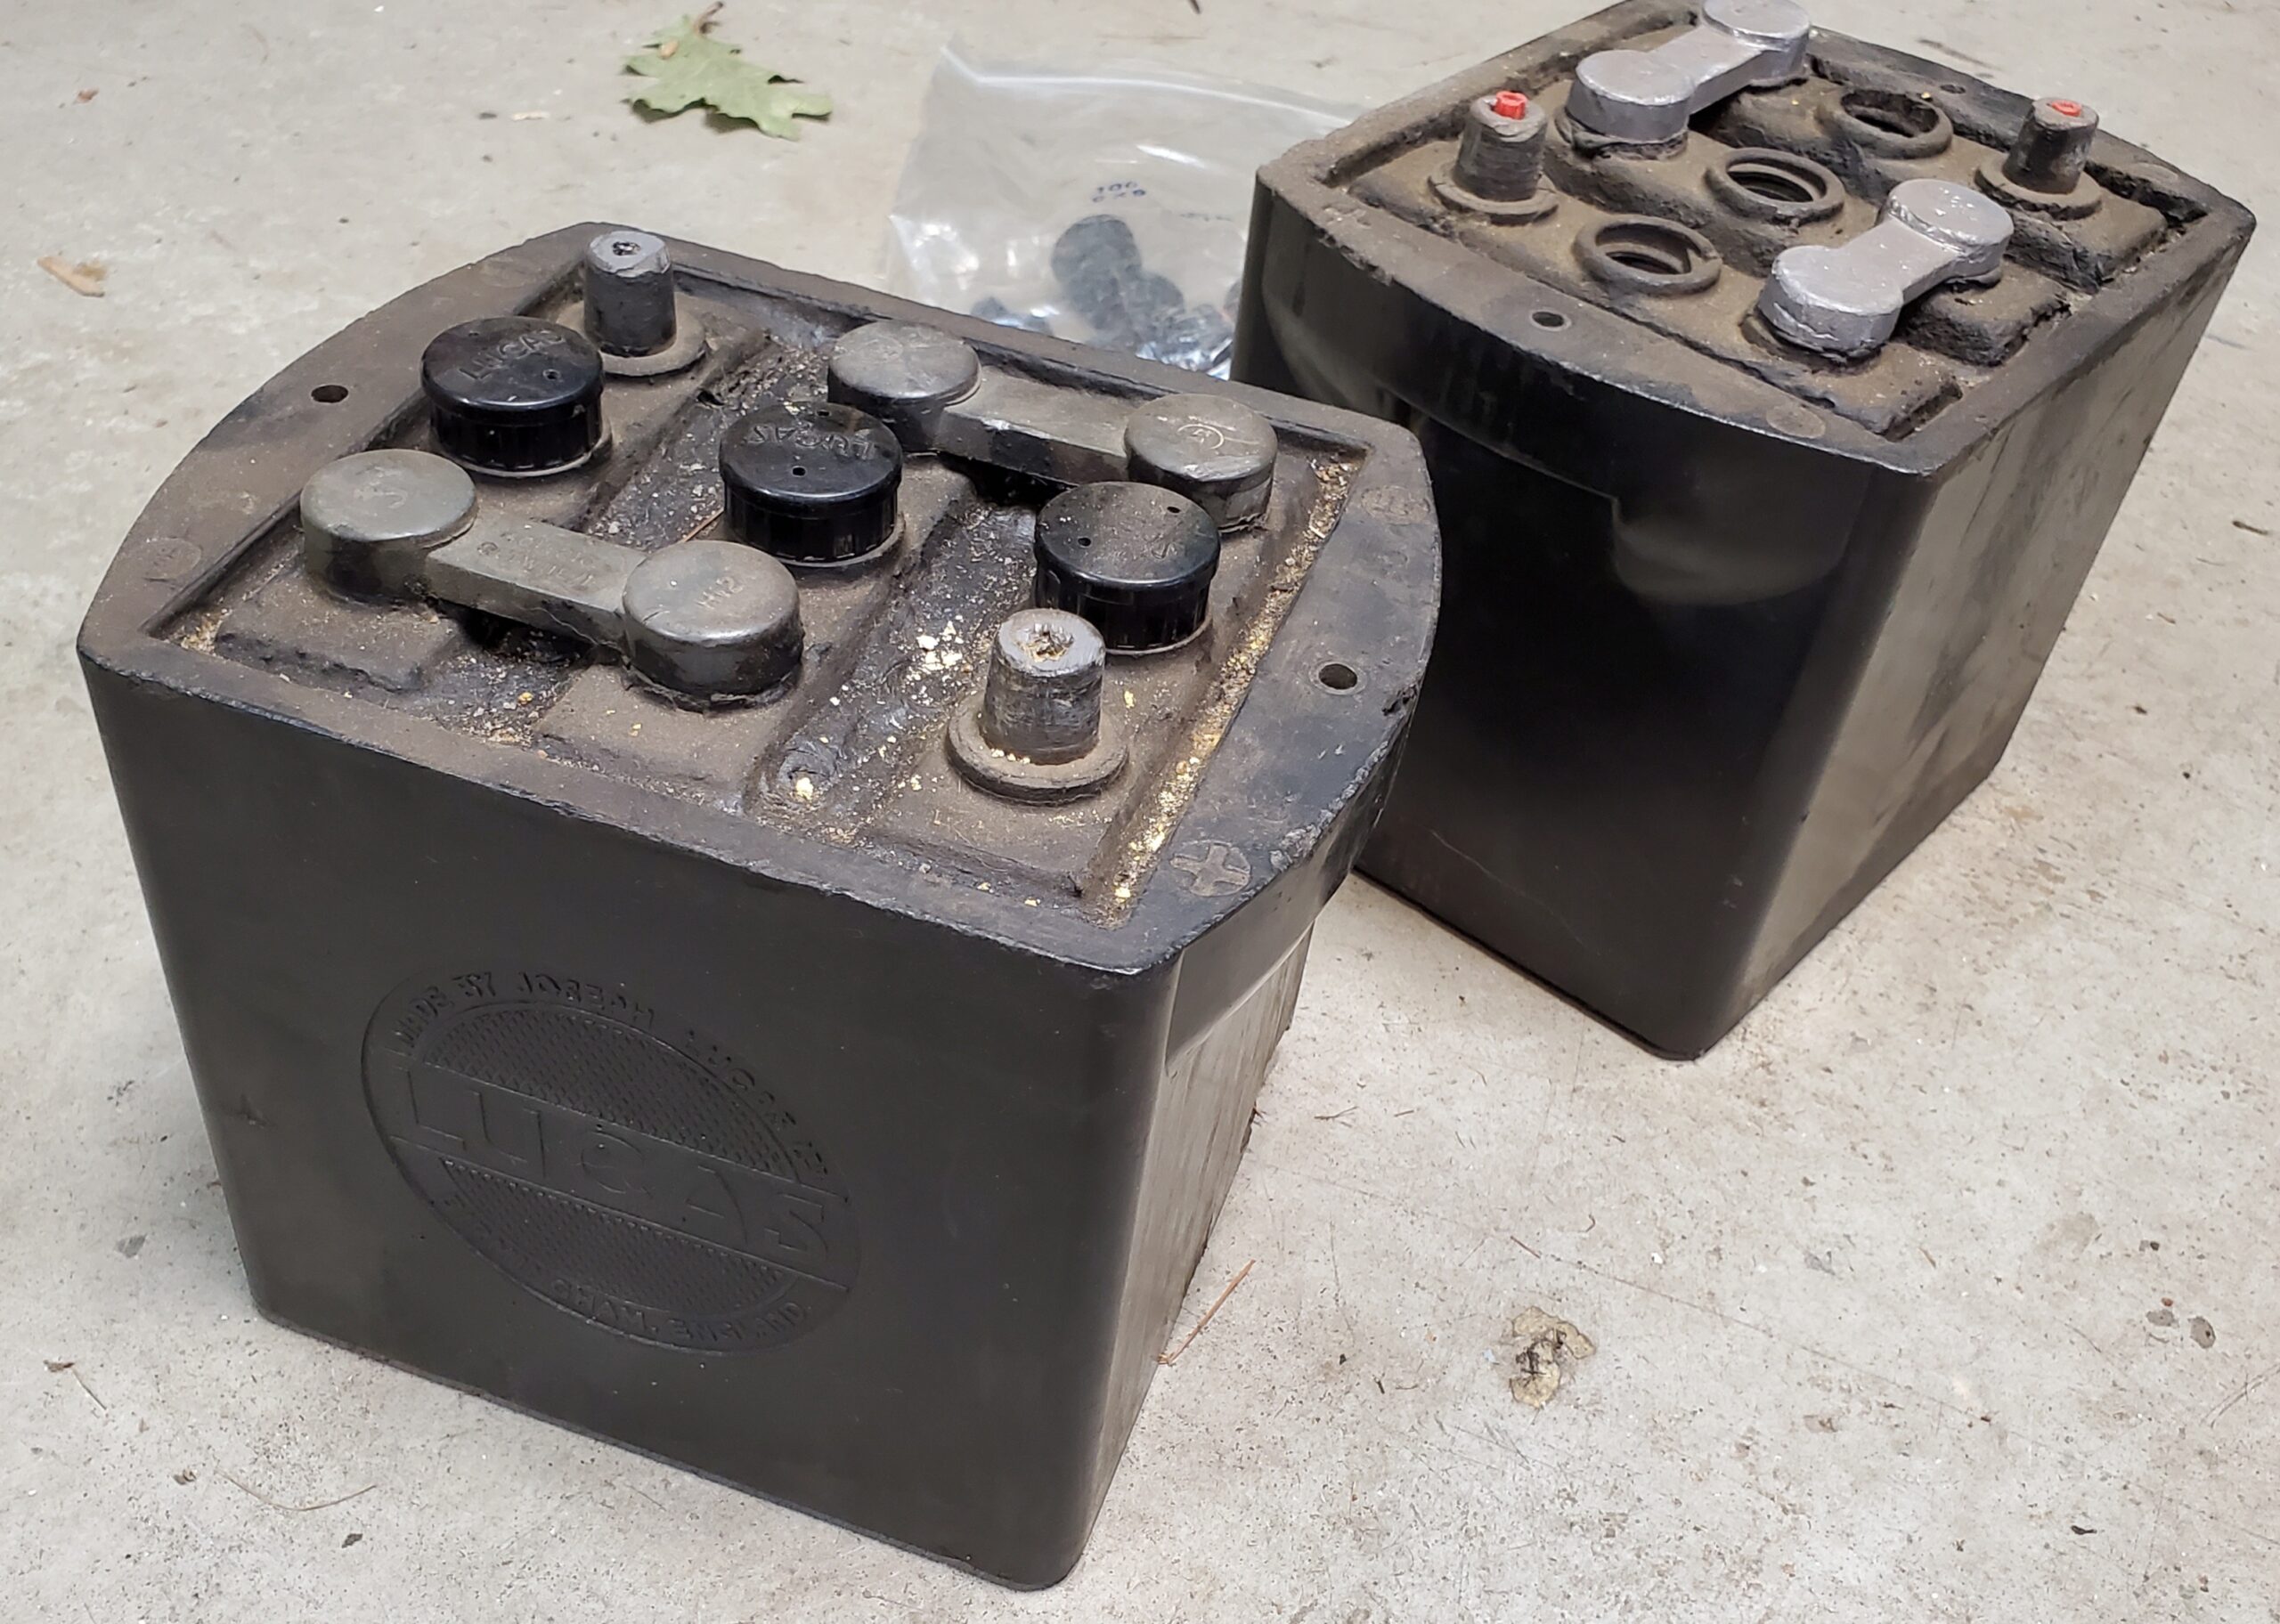
During the final weeks of the restoration of my early Austin Healey 100 it became apparent that acquisition of original style batteries was going to become a major problem.
The only “acceptable” batteries for a concours car are original “Lucas” 6 volt 17L “tar-top” batteries.

I had acquired a pair of originals with a view to having them rebuilt but, when I made inquiries about having this done, it quickly became obvious that this was just not going to happen as the only re-builders that I could find worked exclusively on large industrial batteries and had neither the parts nor any interest in tackling such a small job.
I had had a pair of reproductions on order for some months but calls to the supplier were not encouraging and the chances of getting them before Enclave 2015 were virtually nil!
I decided that an alternate plan was called for.

I had seen several track racing minis equipped with Ballistic Lithium Ferrous Phosphate batteries and, having had some experience with starting highly tuned competition engines, I felt sure that if one of these batteries could start a race mini it could probably start a Healey 100 engine with a compression ratio of only 7.5:1. When one of the mini racers mentioned that his Ballistic battery had provided good service for 3 seasons I was convinced.
The problem is of course that this modern battery really did not look much like the old “tar-top” Lucas relic from 1953!!
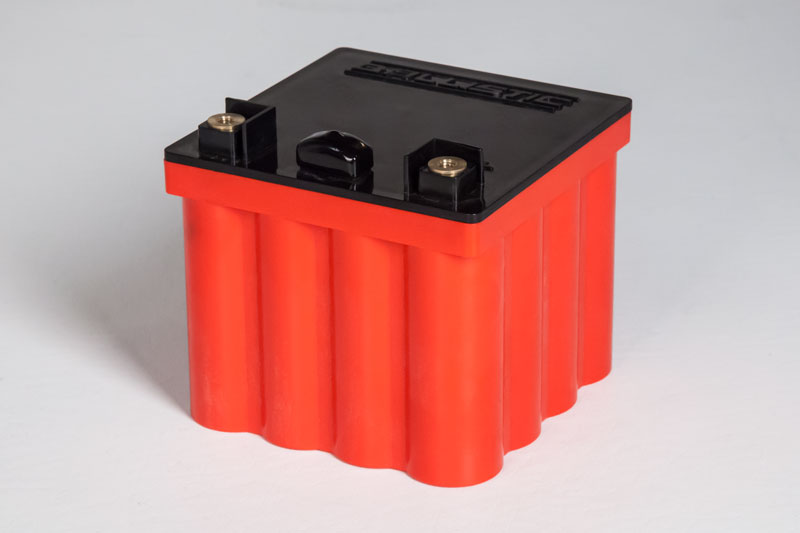
However, upon further investigation, it became apparent that the tiny size of these modern batteries meant that one with sufficient cranking capacity for a Healey would easily fit inside the case of the original Lucas battery.
Here is how it is done.
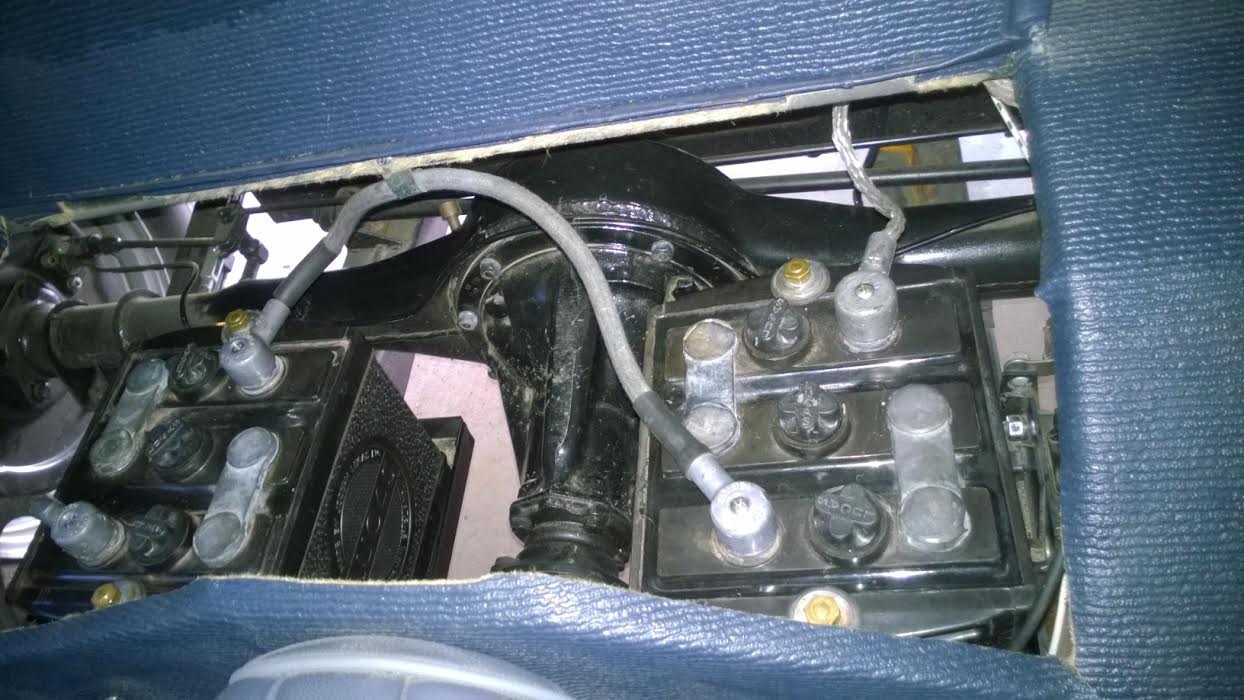
Of course to start you have to have a pair of original or reproduction tar-top batteries to modify.
CAUTION : BATTERY ACID IS VERY CORROSIVE. WEAR GOGGLES AND GLOVES
Be sure to use rubber gloves and wear goggles while working with the battery.
First confirm that the battery is TOTALLY discharged by checking that the voltage cross the terminals is ZERO.
Next remove the fill caps and drain all the old electrolyte (acid) out of the original batteries. Refill the battery with water and drain 2 or 3 times to neutralize the electrolyte. Also see if you can safely recycle the acid and do not run it down the drain. Do rinse the case over and over before you start cutting and pulling stuff out. You may also want to wear a mask as acid fumes are nasty. (Thanks Ira).
The next task is a bit brutal.
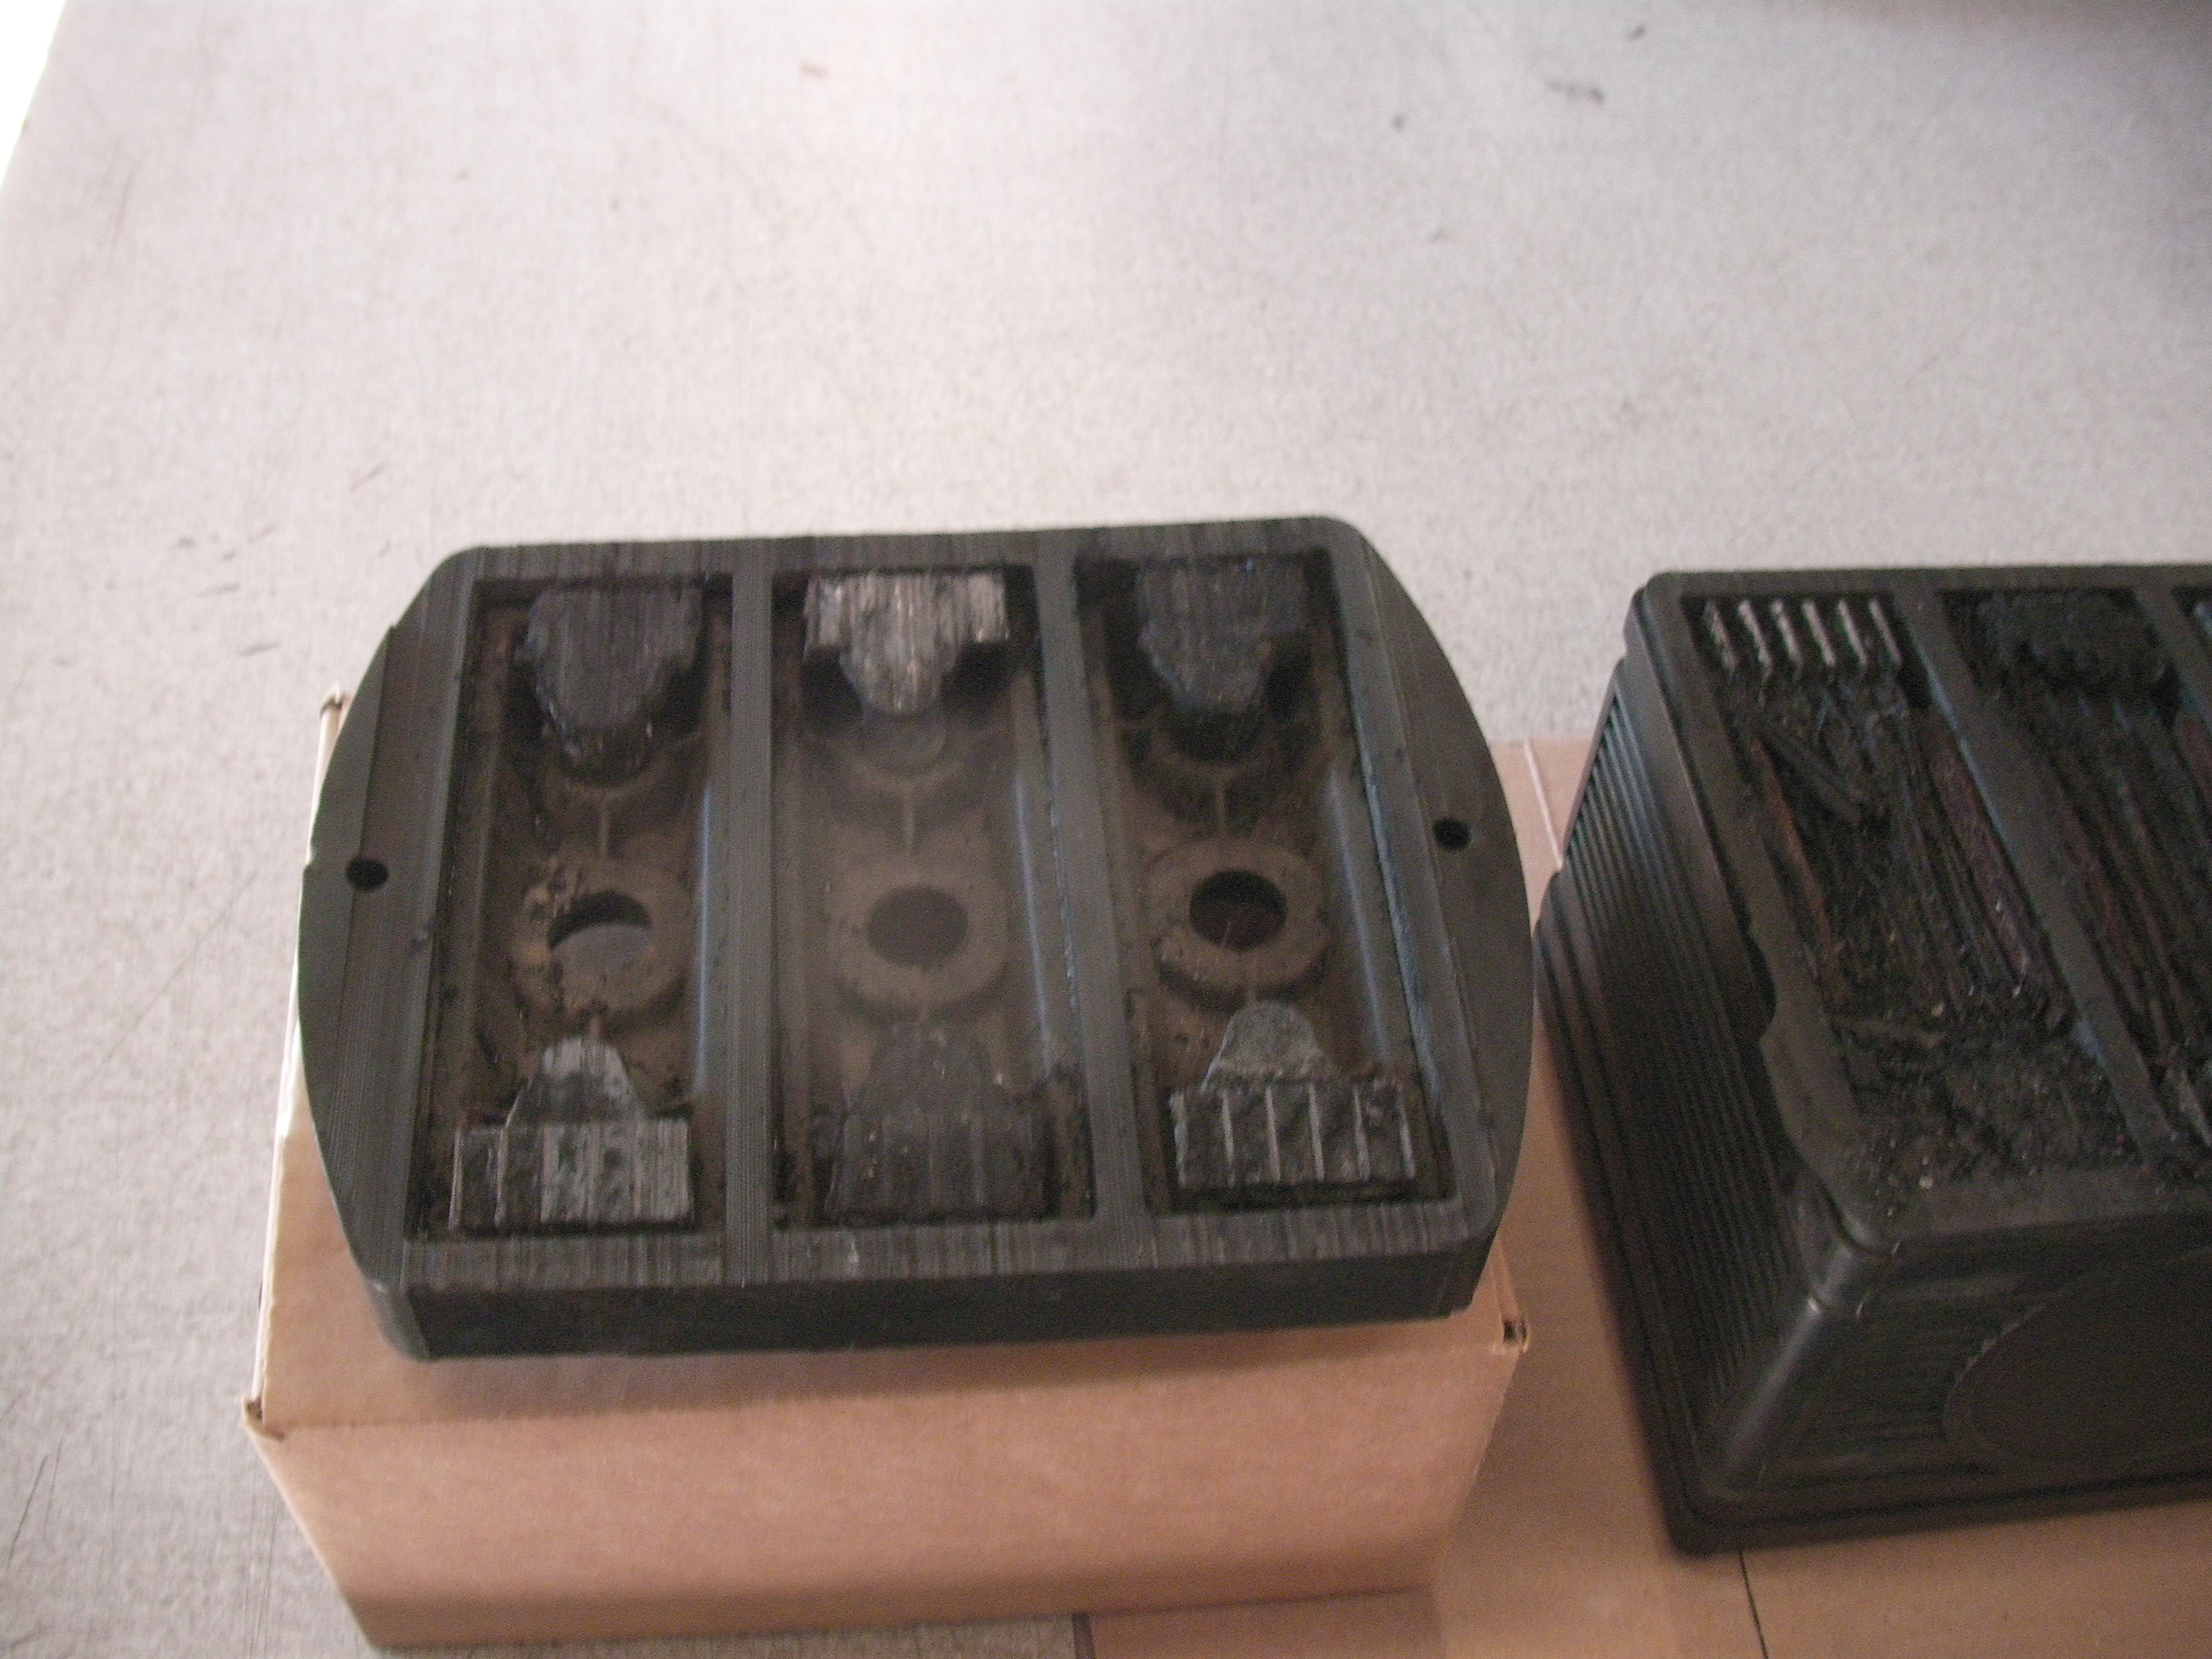
Using a sharp handsaw saw or similar implement of destruction cut the tops off the original batteries. Cut straight across all the way just below the bottom of the hold down lugs then pull out all the lead plates and dispose of them safely.

The next task is to remove the 2 dividing partitions from the case of one of your 2 batteries. These need to be cut out right down until they are level with the grid in the bottom of the case. A multi-purpose oscillating tool works quite well for this but I’m sure there are plenty of other methods. Once you are done the cavity within the case will be around 6 3/8″ long x 5 5/8″ wide x 4 3/4″ high.

Note: With the second battery it is only necessary to cut some small “V”s out of the top of the partitions but we didn’t figure that out until all the work had been done to remove them entirely.

To ensure that the lid will index accurately when replaced on the case we installed some plastic guides on the underside of the lid.
Once this is done you will find that your new Ballistic EVO2 16 Cell battery will easily fit right inside the case.

I used some strips of Styrofoam insulation to “nest” the Ballistic battery and ensure that it wouldn’t rattle around inside the case.
The next task is to connect the Ballistic battery to the +ve and –ve posts molded into the lid of your original battery. These connections and the cables will have to carry the full load of the starter so they have to be fairly substantial.
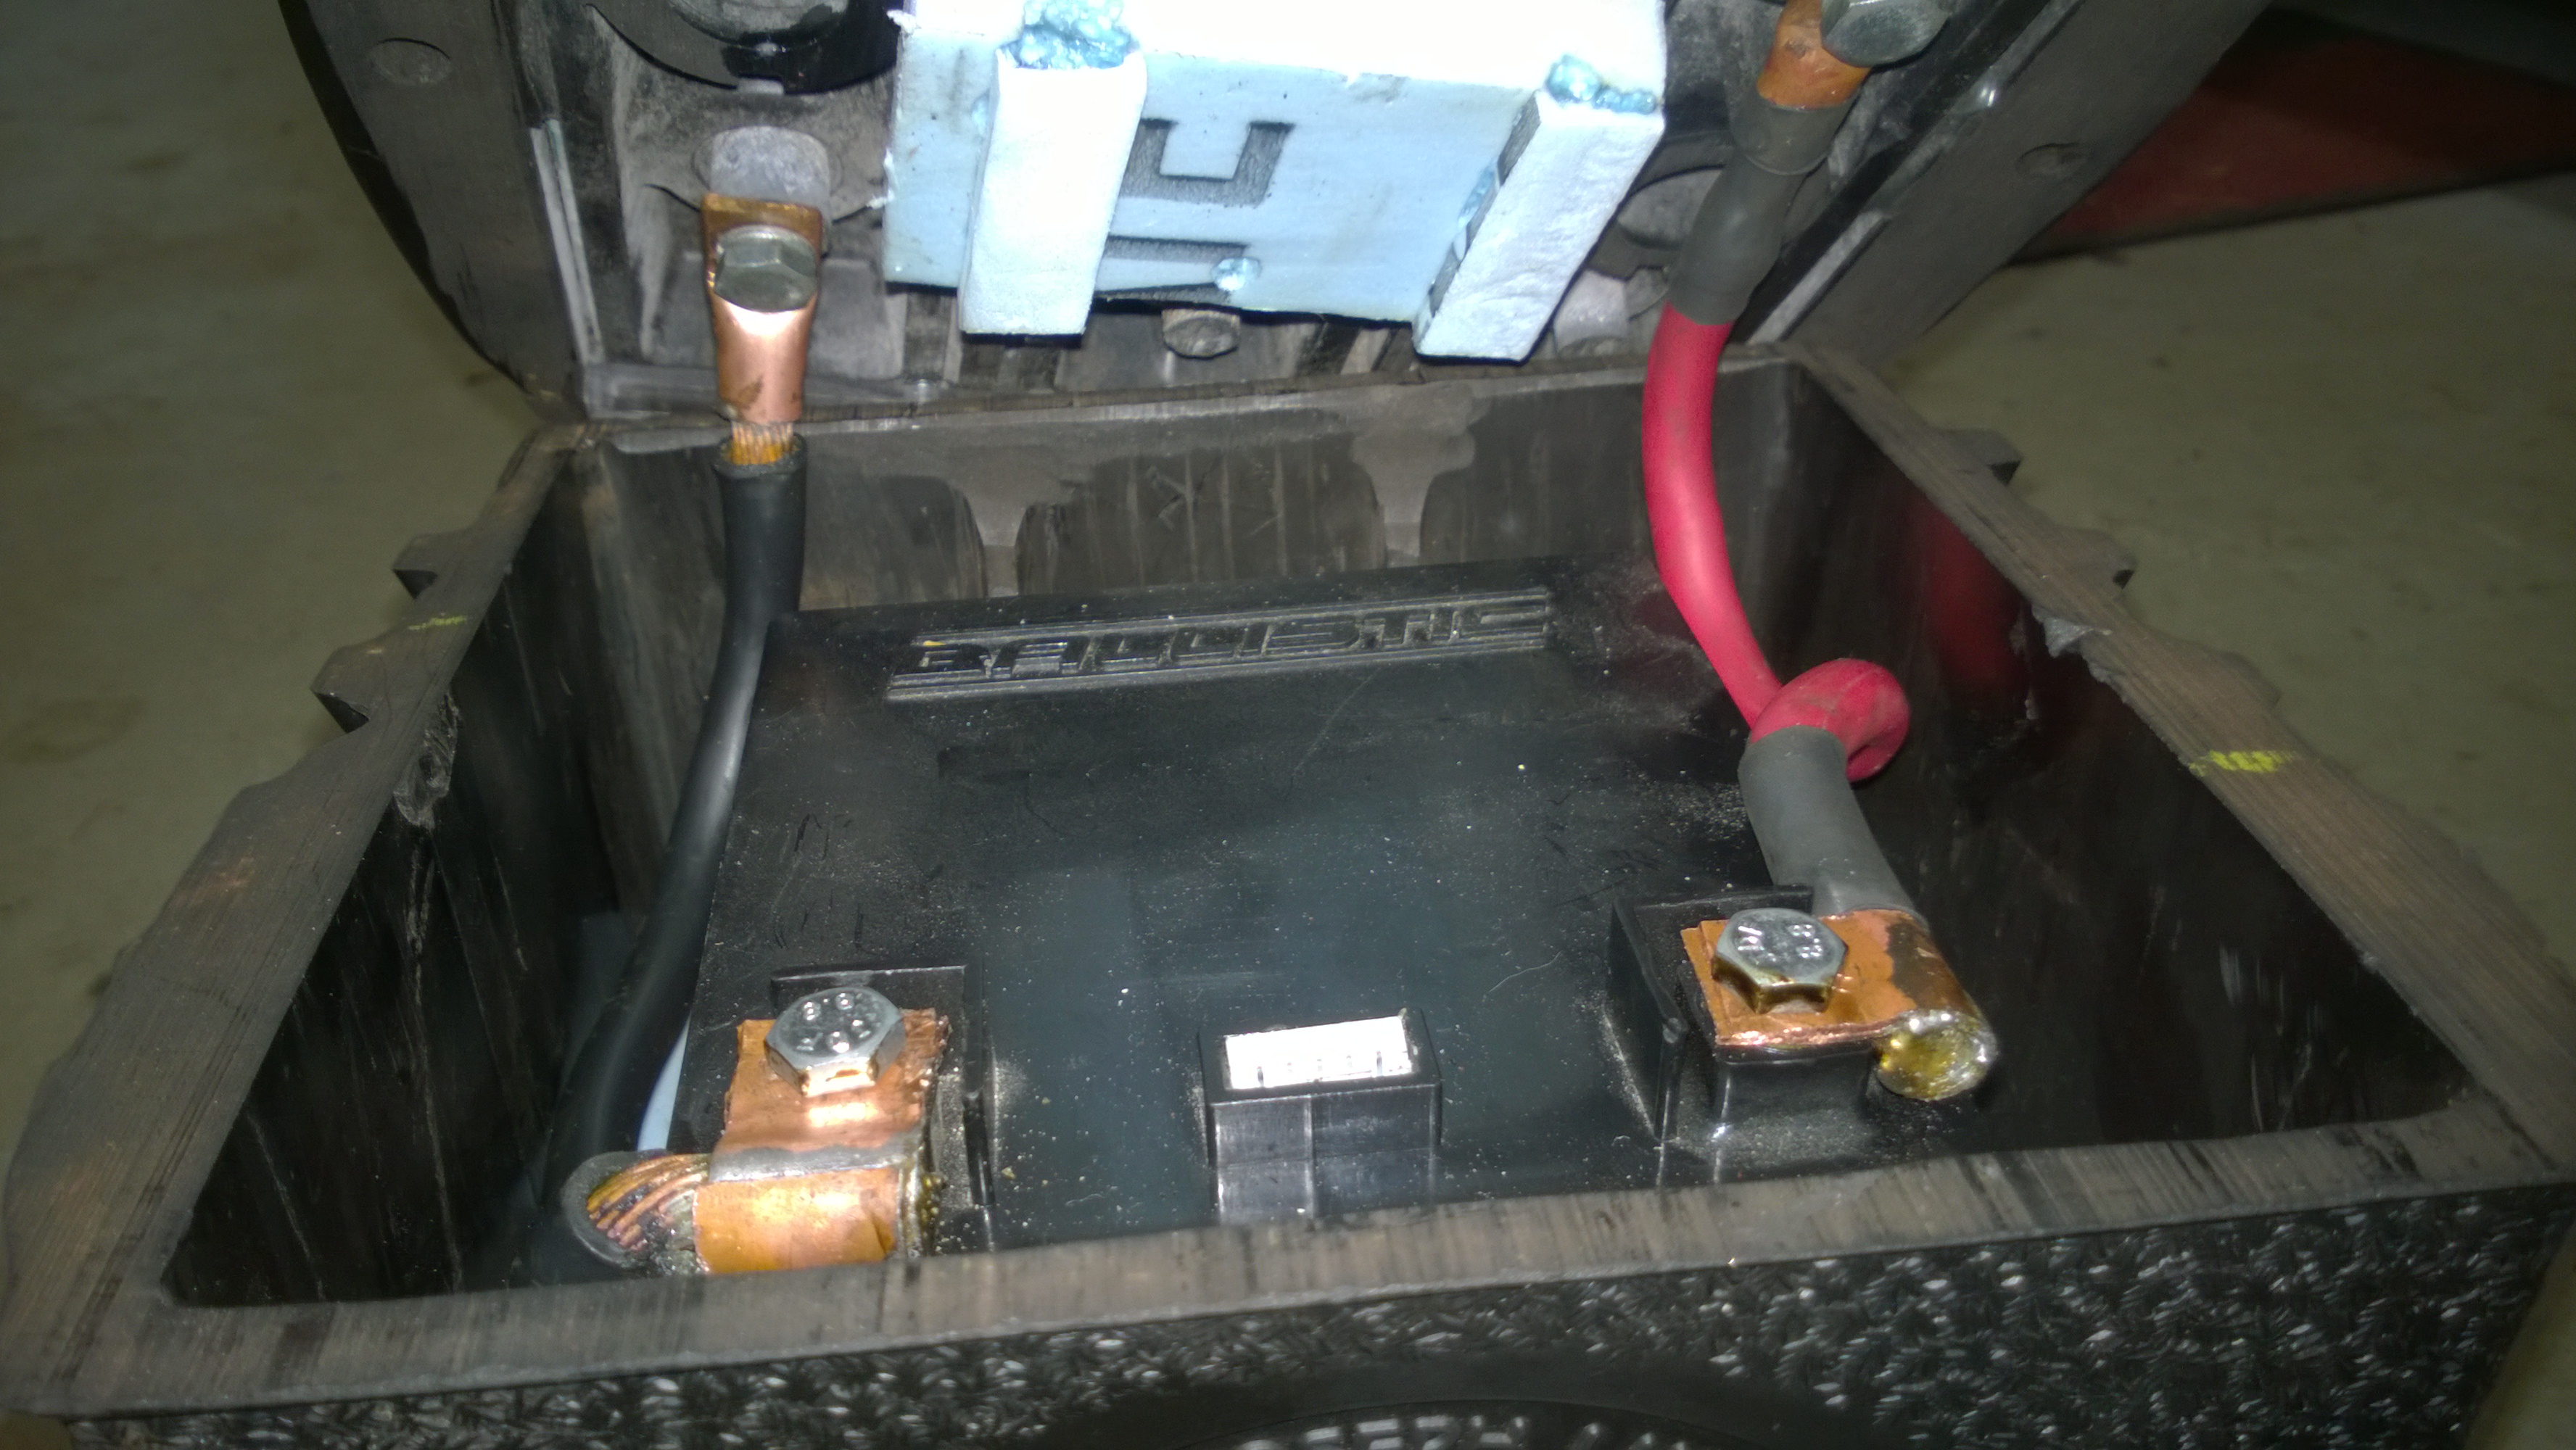
I used sections of some old heavy duty booster cables to make up short jumpers for this. It was necessary to drill and tap the undersides of the posts to secure the terminals that I had soldered onto the ends of my jumpers. Be sure to make the jumpers long enough that you can attach the Ballistic battery terminals to them as you install the lid.

With the second battery it is only necessary to make up a jumper, again heavy duty, to link the +ve and -ve terminals. That is why some small “V”s in the partitions on the second battery are all that is required.

It is not necessary to glue the top back in position as the as the original battery securing rods will hold it in place..

Now install the batteries into the car and you are almost finished.
One last thing and this is very important if you want your expensive lithium ferrous phosphate batteries to last a long long time.
The instructions that come with the Ballistic battery emphasize that over charging will permanently damage the battery so it is essential that you adjust the regulated output of your generator to ensure that the maximum voltage that it can produce is 13.6 volts.
I found this very simple to achieve and procedure is clearly explained in section O/13 of the Factory Workshop Manual. It is the regulator adjustment that needs to be adjusted as this is normally set to something around 15.5 volts for a lead/acid battery.
Use a digital voltmeter to get it right and make sure that you drive the car while checking the revised output voltage just to ensure that it is correct.
I would recommend leaving a note inside the cover of the regulator indicating that it will require readjustment if lead acid batteries are installed in the car at some later time because an output setting of 13.6 volts will decrease the storage capacity of such batteries.
A couple of other things that are important to remember are:
- Just like a lead acid battery your Ballistic battery will be permanently damaged if allowed to completely discharge so be sure to turn off your master switch when you are storing the car for more than a few days.
- A regular battery charger is capable of delivering more than 13.6 volts… Be sure to use one that will not overcharge your Ballistic battery
POST UPDATE
After using the Ballistic EVO2 battery for 2 years I was having a couple of issues:
1: The battery seemed to have lost a little “grunt” and was having difficulty starting the Healey engine from cold. Once started for the day it managed just fine but cold starting was becoming a problem.
2: The original Lucas C45-PV5 generator used in the 100 has a maximum output of 22 amps. Unfortunately with the lights, wipers and heater fan running the electrical load is a few amps more than 22 amps so over time on a wet night there is a small but constant discharge from the battery which becomes quite substantial at idle. The original lead acid batteries had a 50 amp hour capacity. Unfortunately the Ballistic battery is only around 10 amp hours which presented problems in such conditions.
Additionally the Ballistic Battery company had closed down which called for some more research.
Fortunately some other batteries have come to market in recent months and I found this one.
 With 480 cranking amps, a capacity of 22 amp hours and just small enough to fit inside the original Lucas 6 volt battery case. I decided to give it a try.
One of the nice things about Lithium Ion batteries is that they are easy and light to ship around so I had a new one on my doorstep in days.
 In addition to changing to the Antigravity battery I decided to include a 200 amp reset-able breaker into the circuit because a couple of readers had pointed out that, in the event of a dead short, lithium polymer batteries have been known to catch fire and getting to the battery in an Austin 100 is not easy. This is the type of breaker selected, readily available on Ebay. These have a test button on top and a reset lever.

I made a combination conductor and mounting bracket and attached the breaker to the side of the battery.
Getting this battery inside the case required some careful measurements but once installed it works like a charm!!

I also managed to arrange the positioning of the Antigravity battery such that the breaker reset lever is accessible through one of the “dummy” filler caps so that in the event that the breaker should trip it can easily be reset through the filling port.
In an effort to further improve things I also decided to convert the headlights to LED and purchased a pair of “Double Dipper” bulbs from Classic Dynamo & Regulator Conversions along with an electronic conversion of my original regulator which will eliminate the possibility of overcharging the lithium ion battery.
Delighted to report that so far the results are brilliant. The generator is easily able to keep up at full load, the headlights are brighter and none of these changes can be seen.
Hi Michael-any new thoughts on replacing the 17Ls with internal batteries that don’t spit acid? I currently switched over to one 12V on right side, but I really want to keep concours “look” so the two Lucas casings (Antique Auto Battery) i have saved are proper.
I see your procedure for dumping and cutting the original ones, but I’m leery of Lithium and its tendency to “flash fire”…what do you think is the best solution today. There is a company that is supposedly going to make one, correct style, awaiting Lucas approval.
Michael, There is a photo of an earlier yet similar set of batteries to what you used, 1930s to 40s vintage. This led me to your post, just wanted to find out if you know about these as that is what I am looking for. I do have one and some cases like yours.
John, I think the photo that you are referring to is of a pair of original batteries that are from a 1956 BN2 which I have in my garage.
Michael,
There is a photo of an earlier yet similar set of batteries to what you used, !930s to 40s vintage. This led me to your post, just wanted to find out if you know about these as that is what I am looking for. I do have one and some cases like yours.
Hello Michael
I have watched with interest your contributions to the Austin Healey Club of New England webinars – thank you.
I am looking for an update on your modifications of the twin six volt batteries as used in the BN2. I have a pair of 17L batteries that have expired and I am considering your Anti-gravity modification since the lead acid batteries do not seem to have a very long life and are expensive to boot. Since published have your made any changes in either the battery or opinion that this is the way to go? Do you have any additional suggestions or insights you care to share. Thank you very much, Jake Kreeger
I just happened across this in a search and thought it looked interesting….. The issue with the cranking is that you have gotten 12 volts, but much lower amps with using one battery. I understand that you are going for concours appearance. I might suggest using two batteries, and using the hold down bolt(s) on the second battery as ground (earth).The cable between the two batteries would connect the two positives (assuming negative ground) then a cable inside the case would pass this connection on to the second battery’s positive. Because….. the only difference between series and parallel is the location of the ground on the second battery. I hope this makes sense, I scribbled it out on a random piece of paper to make sure it would work.
Interesting idea, and similar to one that I had considered of running a ground from the second battery through the bottom of the case.
Fortunately the replacement battery that I have now fitted is really working well and in conjunction with the LED headlamp bulbs seems to be a good solution.
Many thanks for passing along your idea.
Michael;
As you know Antique Auto Battery is no longer producing the 17L 6 volt batteries. So if you want to have a concours restoration there are not any options. Recently my 6 volt batteries died. They were six years old. I used your article, and a set of 17L shells and produced a similar set up. I however used an Antigravity 24 cell V10 battery. I store my car in a heated garage. I installed the battery set up with the XPS V10 battery, in my car just the other day. It took four or five weak starting attempts before the car finally kicked over. Once we got past the initial start up the car turned over freely on future attempts. I’ve got the battery on a trickler that I bought with the battery, I will start her up again in a few days and see how it goes. I believe this was also your experience with the lithium battery????
Mark K.
Hi Mark, thought you might like an update … I have replaced the Ballistic battery with an Antigravity YTX12-16 which is a pretty tight fit inside the original Lucas case but the result is a wonderful improvement.
Engine cranks well from cold and starts easily.
I also recently installed LED headlight bulbs, almost undetectable and now with the lights, heater fan and wipers on I’m getting a positive charge of around 4 amps at highway speeds … vast improvement over the 3 amp discharge before replacing the bulbs.
I feel much more confident heading out on a long trip now.
Could you add a second small battery in parallel to gain any strength?
I’ve given that a lot of thought Bob but have been unable to come up with a solution that would maintain the “original” look. Maybe someday Ballistic will come out with a 6 volt version of their batteries.
Here are some “post installation” notes on this modification.
The cranking speed using an original Lucas starter is slower than ideal after this modification but the engine still starts easily and reliably so I would suggest that the Ballastic battery (BB) is satisfactory in that regard
When cranking from cold the maximum amperage delivered by the BB is around 175 amps. I had a single small lead acid battery installed before this modification and with that the maximum cranking amps were a little higher at around 200 amps and the cranking speed was slightly faster but by no means “lively”.
With the lights on, blower running and brake lights on, about 150 watts by my calculations, the generator output seems just able to keep up with the load at 2500 RPM. I suspect that is a result of the lower output voltage setting.
Running for a long time in the rain may result in a continuous discharge of the battery but it seems to me that that situation is pretty standard in a 100.
Morning Michael. Excellent description of the process. After watching you start your 100 with the tiny Ballistic battery at Gettysburg I was convinced you had a solution to the unavailable original 100 batteries. As you know I run a small single 12 volt battery mounted on the passenger side original battery hold down but our car is not gold level. Well done.