
As noted in my previous post one of the problems we had with AHX12 in the 2007 Targa Newfoundland was caused by the stretching of BSF bolts which hold the crownwheel to the differential carrier. These 50 year old bolts, made at a time when the quality of fasteners available in Britain was not that good, were not up to the rigors of Targa.
The rules for Targa Newfoundland read as follows:
The central differential housing must remain OES.
The carrier, ring/pinion, axles, and all bearings are free.
Mechanical limited slip differentials are free.
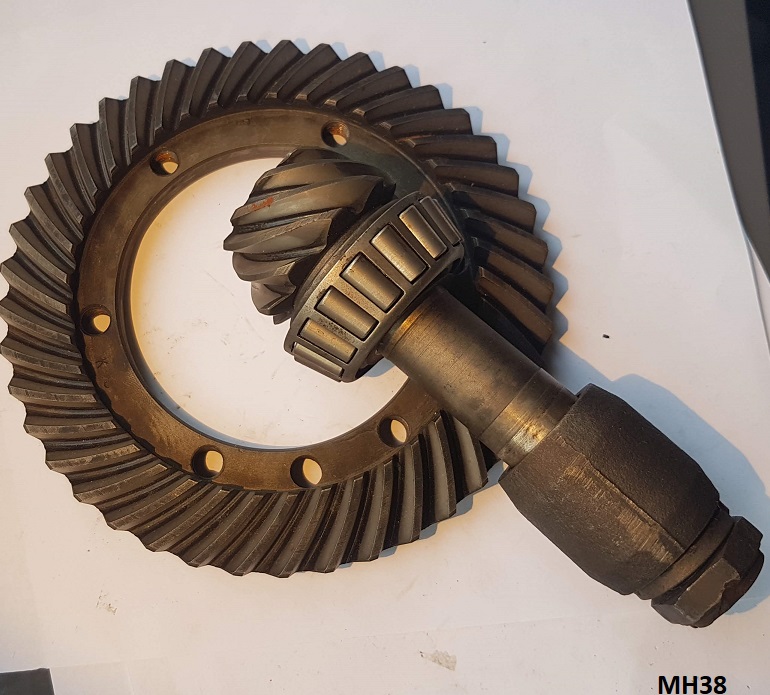
The diff in AHX12 is not your run of the mill BN1 unit. In my previous post I have explained how we have managed to retain the central differential housing but strengthened the outboard sections to resolve the problem of the inherent weakness of the BN1 style case.
The carrier is a standard BN1 item, however the cage is from a Studebaker Lark V8 and incorporates a Dana POWR-LOK 27 limited slip unit. In order to get this cage assembly into the BN1 housing we had to turn down the bearing mount on one end of it and install a BN1 style ball bearing there, and use one of the taper roller bearings from the Dana unit on the other end.
Next an annular ring was machined and welded on to produce a correctly sized and positioned mount for the 32 tooth crownwheel from the 3.55/1 ratio gear set. This is what the whole thing looks like with the crownwheel not installed.
With this arrangement the cage assembly ends up being very close to the housing and, as there was insufficient clearance for the heads of the crownwheel mounting bolts, we counter-bored holes to recess the heads below the surface of the cage.

As the crownwheel is on the right side, when these bolts started to back off, their heads contacted the carrier casting which in turn tended to loosen them further. The noise generated as their heads ground away at the cast aluminium carrier was quite dreadful.
In this picture you can see just how much material was worn away.
Now, as I’m rebuilding the diff unit, I am somewhat perplexed as to how to prevent a reoccurrence of this issue. Previously I had used Loctite and good lock washers to lock the crownwheel bolts but even though the real problem was initiated by the stretching of the bolts I’m not confident that this locking method is satisfactory.
In the original BN1 differential 4 two hole tab washers were used to mechanically lock the bolt heads but, because our bolt heads are recessed, that system won’t work.

After considering drilling the bolt heads and lock wiring them, or drilling the heads, tapping a small thread in the hole then installing a tiny Allan head screw into the hole to be tightened against the wall of the recess, the best that I’ve been able to come up with is to make some two eared tab washers like this.

The flat tab would project through the gap at the outer edge of the counterbore and the turned up tab would be pressed against a flat of the bolt head to prevent it from loosening off.
Unfortunately I’ve been unable to find a production tab washer of this type so it would appear that my only options are to grind and file some out of some 3/8” fender washers, very time consuming, or have them laser cut, very expensive.
Does anybody out there have a better idea…
Micheal,
Echoing what Jim said, I’d use a flat washer under the head of the bolt and go with the safety wire. You can get a jig for drilling the holes from various places – Earl’s is one (http://www.earlsindy.com). Or if you can use UNF bolts, Earl’s probably has pre-drilled bolts.
Bob
Hi Ken, thanks for looking.
If I’m not mistaken the washers at: http://www.aircraftspruce.com/catalog/eppages/501867tabwasher.php
are the same 5/16″ ones used inside the Healey overdrive unit to lock the nuts on the bridge pieces. I have some but unfortunately they are too small. Grrrrrr..
Michael:
Here is a solution but it is a little labor intensive.
1.Mount the Dana/Crown wheel assembly in a lathe and cut a shallow groove in the perimeter slightly through the weld on the adapter, about .0625″ depth. Use a small round nose tool.
2.Drill your bolt heads for safety wire with a 1/16″ drill bit – light feed, lots of cutting oil for grade 8 bolts.
3.Torque the bolts to spec, including loc-tite – no split washer. Safety wire pairs of bolt heads together in the customary and accepted aeronautical method, running the connecting wire along the groove that you cut around the perimeter.
Should work. Best regards, Jim
It looks to me like Aircraft Spruce has exactly the washer you want for 99 cents and another for $4.00.
Ken
Somebody else suggested that I hit the head with a welder to prevent it loosening off. Sounds awful brutal but I can certainly see the merit in it.
I guess my hesitation is that if we do happen to have to take this diff apart during the Targa we probably won’t have a welder to hand to lock the bolts again!!
I will have to give that idea some serious thought.
Thanks for your suggestion.
Michael:
Locking mechanisms never hold a bolt or nut in place, the only method is to ensure the correct bolt extension on an aircraft standard bolt or stud. At one point some UK piston aero-engines had big end bolts attached in this way. The only aero type 1 locking is a tab washer or better split pin — they ensure that the nut does not drop into the gubbins if it does come loose. Pratt & Witney would sometimes put a blob of weld on the tread/bolt. Easily ground off at overhaul and you should change such highly stressed assemblies each time anyway so scrap is not an issue